


Presence and Busy Lamp Field (BLF)
How does BLF / Presence work?
The Presence or Busy Lamp Field (BLF) is light on an IP phone showing the presence information of any other extensions connected to your account.
BLF works through the SIP protocol by messaging your phone advising the current state of any other phones on your account that have also subscribed to your BLF list. Once the status of any monitored extension changes from idle to busy or vice versa, the other subscribers are notified by our CloudPBX of the change in status by acknowledging the NOTIFY SIP message with a 200 OK SIP message.
We automatically enable Presence / BLF on our network.
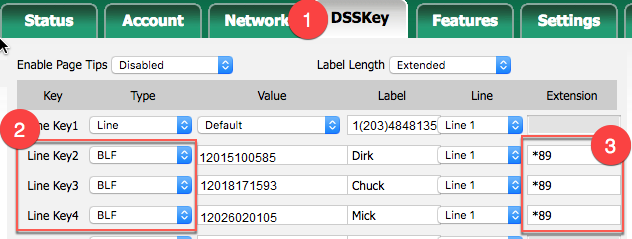
Setting up BLF on your Yealink
Select the DSSKey tab.
Select the line key you wish to monitor.
Set Type to BLF.
Set Value to the phone number you wish to monitor – NB requires country/area code.
Directed Group Pickup: On the Extension column set each BLF number to *89 (see picture below).
NB – *89 enables a caller within the BLF group to pick up another BLF phone using the BLF key (see also Short Keys).Click Confirm to save and apply.
When configured, the LEDs should light up accordingly on your Yealink.
Green: extension is available. Press the BLF key to dial the extension.
Red: extension is on a call.
Blinking red: extension is receiving a phone call. Press the BLF key to perform pick-up.
Setting up BLF on your Polycom
Settings > Directories > Contacts Directory >
{undefined}(Add (+) : Name, Last Name (optional), Contact (requires full number including country / area code)
Protocol –> SIP (only for VVX500, 600).
Watch Buddy –> Enable
SAVE.
Select contact –> Add to favorites (if you want the contact to appear on the home screen of your keypad).
Setting up BLF on your Cisco SPA
Log on to the phone’s Web UI (Settings | Network | Current IP).
Type [IP address]/admin/advanced (see screenshot below).
Phone Tab | Line Key 1.
Paste and edit the following function into Extended Function: fnc=blf+sd+cp;sub=12036809262@[exampleproxy.com];usr=12036809262;nme=Betty
Click Save and reboot the phone.